ユーザ用ツール

サイト用ツール


このページの翻訳:


最近の更新


Tag Cloud

01_linux:08_仮想化:juju:01_juju_maas_openstack

01 JuJu Maas Openstack

JuJu(魔法)を使って、MAAS(Metal as a Service)を動かし、さまざまなサービスモデルを作ることができる。

JuJu+MaasでOpenStackをデプロイしてみる。
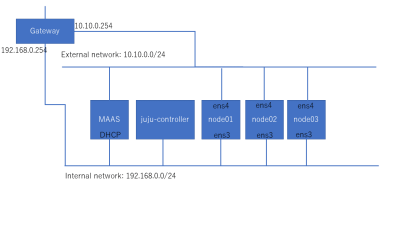
今回はUbuntuサーバに、KVMをれ入れて下記の5VMを立てて検証してみる。

hostname external internal tag
MAAS 192.168.0.1010.10.0.10
juju-controller DHCP bootstrap
node01 DHCPnode01
node02 DHCPnode02
node03 DHCPnode03
NicPXENetworkDHCP Gateway Space
ens3192.168.0.0/24MAAS-DHCP 192.168.0.254 internal
ens4 10.10.0.0/24No DHCP 10.10.0.254 external
ens4.50 100.100.100.0/24No DHCP 100.100.100.254 global

01. Maas Install

Maasとは

Maasとは、Metal-as-a-Serviceでベアメタルを提供するサービス

apt upgrade

$ sudo apt -y update
$ sudo apt -y upgrade

maas install

$ sudo apt install maas

maas init

$ sudo maas init
[sudo] password for matsui:

Note: Configuring the MAAS snap in "all" mode will be
deprecated in MAAS 2.8.0 and removed in 2.9.0.

See https://maas.io/deprecations/MD1 for details.


Mode (all/region+rack/region/rack/none) [default=all]?
MAAS URL [default=http://192.168.0.10:5240/MAAS]:
Create first admin account
Username: admin
Password:
Again:
Email: hoge@hogehoge.com
Import SSH keys [] (lp:user-id or gh:user-id):gh:flateight

「Import SSH keys」でLaunchPadかGithubの公開鍵をインポートできる。
この場合flateightの公開鍵をインポートしてみました。
SSH公開鍵は後で設定可能なので、省略可能です。

UI

これでhttp://192.168.0.10:5240/MAASからUIにアクセスできる。

  • ログイン後、Ubuntu imageで20.04 LTSを選択し、Update selectionをクリック
  • SSH keyをアップロードしておく
  • Subnetsから、192.168.0.0/24ネットワークを選んでDHCPを有効にしておく

02. JuJu

JuJuとは

JujuはCanonical社が提供するプロビジョニングツール
JuJuはMaasに接続して、MaasのMetalサーバを利用し様々なアプリケーションをデプロイする。

juju install

sudo snap install juju --classic

03. jujuにMaas登録

Yaml用意

$ vim mymaas.yaml
clouds:
   maas-server:
      type: maas
      auth-types: [oauth1]
      endpoint: http://192.168.0.10:5240/MAAS

登録

juju add-cloud maas-server mymaas.yaml

MaasのAPIキー登録

$ juju add-credential maas-server
This operation can be applied to both a copy on this client and to the one on a controller.
No current controller was detected and there are no registered controllers on this client: either bootstrap one or register one.
Enter credential name: maas-server-credential

Regions
  default

Select region [any region, credential is not region specific]:

Using auth-type "oauth1".

Enter maas-oauth:

Credential "maas-server-credential" added locally for cloud "maas-server".

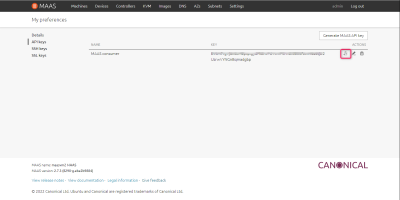
APIキーは下記MAASのUIからコピー

credential確認

credentialが見えればOK

$ juju credentials
No credentials from any controller to display.

Client Credentials:
Cloud        Credentials
maas-server  maas-server-credential

MAASの登録確認

matsui@maasvm2:~$ juju clouds
Only clouds with registered credentials are shown.
There are more clouds, use --all to see them.
You can bootstrap a new controller using one of these clouds...

Clouds available on the client:
Cloud        Regions  Default    Type  Credentials  Source    Description
localhost    1        localhost  lxd   0            built-in  LXD Container Hypervisor
maas-server  1        default    maas  1            local     Metal As A Service

04. juju bootstrapノードデプロイ

juju からの命令を受けて処理するノード

デプロイには結構時間がかかる。

$ juju bootstrap --constraints tags=bootstrap  maas-server maas
Creating Juju controller "maas" on maas-server/default
Looking for packaged Juju agent version 2.9.22 for amd64
Located Juju agent version 2.9.22-ubuntu-amd64 at https://streams.canonical.com/juju/tools/agent/2.9.22/juju-2.9.22-ubuntu-amd64.tgz
Launching controller instance(s) on maas-server/default...
 - 4t8t4s (arch=amd64 mem=16G cores=8) 
Installing Juju agent on bootstrap instance
Fetching Juju Dashboard 0.8.1
Waiting for address
Attempting to connect to 192.168.0.251:22
Connected to 192.168.0.251
Running machine configuration script...
Bootstrap agent now started
Contacting Juju controller at 192.168.0.251 to verify accessibility...

Bootstrap complete, controller "maas" is now available
Controller machines are in the "controller" model
Initial model "default" added

05. charm install

charmはgit みたいなもので、charm(魔力)の意味らしい

charm(魔力)を使ってJuJu(魔法)でMAAS(Metal as a Server)を動かすという事らしい

$ sudo snap install charm --classic
[sudo] password for matsui: 
charm 2.8.2 from Canonical installed

06. OpenStack base Deploy

charm pull openstack-base ~/openstack-base

### charm pull specific version
charm pull openstack-base-73 ~/openstack-base-73

bundle.yaml用意

data-portと、osd-devicesとノード情報だけ変更しました。

$ cd ~/openstack-base
$ vi bundle.yaml

series: focal
variables:
  openstack-origin: &openstack-origin cloud:focal-xena
  data-port: &data-port br-ex:ens4
  worker-multiplier: &worker-multiplier 0.25
  osd-devices: &osd-devices /dev/vda
  expected-osd-count: &expected-osd-count 3
  expected-mon-count: &expected-mon-count 3
machines:
  '0':
    constraints: "arch=amd64 tags=node01"
  '1':
    constraints: "arch=amd64 tags=node02"
  '2':
    constraints: "arch=amd64 tags=node03"
.
.
.
.
.

デプロイ

$ juju deploy ./bundle.yaml

後は待ってればOK

$ watch -c juju status --color

valt block

待っていると下記のようにvaultのところがblockedで止まってしまう。
これはvaultの初期化が必要ので、シェルを実行して初期化する。

vault/0*                     blocked      idle        0/lxd/6  10.108.0.16     8200/tcp           Vault needs to be initialized
  vault-mysql-router/0*      active       idle                 10.108.0.16                        Unit is ready

対応

下記でvault初期化の一連の流れを実行する

$ git clone https://github.com/flateight/juju-openstack-base.git
$ cd juju-openstack-base/
$ bash vault.sh

07. OpenStack操作

OpenStack client install

$ sudo snap install openstackclients --classic

環境設定読み込み

$ source openrc

イメージ作成

$ curl http://cloud-images.ubuntu.com/focal/current/focal-server-cloudimg-amd64.img | openstack image create --public --container-format=bare --disk-format=qcow2 focal

外部ネットワークの作成

openstack network create --external --provider-network-type flat --provider-physical-network physnet1 ext_net
openstack subnet create --subnet-range 10.10.0.0/16 --no-dhcp --gateway 10.10.0.254 --network ext_net --allocation-pool start=10.10.100.100,end=10.10.100.250 ext

内部ネットワークの作成

openstack network create internal
openstack subnet create --network internal --subnet-range 198.52.100.0/24 --dns-nameserver 8.8.8.8 internal_subnet

共用ルータの作成

内部ネットワーク(internal)から外部ネットワーク(external)へ抜ける共用ルータ

openstack router create provider-router
openstack router set --external-gateway ext_net provider-router
openstack router add subnet provider-router internal_subnet

Globalネットワーク作成

VLAN:50のGlobalネットワークも追加しておく
※これは、直接VMにGlobalネットワークを割り当てる場合のネットワーク

openstack network create --external --provider-network-type vlan --provider-segment 50 --provider-physical-network physnet1 ext_net_50
openstack subnet create --network ext_net_50 --subnet-range 100.100.100.0/24 --gateway 100.100.100.254 --dns-nameserver 8.8.8.8 ext402

フレーバーの構成

openstack flavor create --vcpus 2 --ram 2048 --disk 20 m2.small

SSH Key の作成

mkdir -p ~/.ssh
touch ~/.ssh/id_rsa_cloud
chmod 600 ~/.ssh/id_rsa_cloud
openstack keypair create mykey > ~/.ssh/id_rsa_cloud

VM作成

openstack server create --image focal --flavor m2.small --key-name mykey --network internal focal-testvm

フローティングIPの割当

FIP=$(openstack floating ip create -f value -c floating_ip_address ext_net)
openstack server add floating ip focal-test $FIP

アクセス許可設定

PROJECT_ID=$(openstack project list -f value -c ID --domain admin_domain)
SECGRP_ID=$(openstack security group list --project $PROJECT_ID | awk '/default/{print$2}')
openstack security group rule create $SECGRP_ID --protocol icmp --ingress --ethertype IPv4
openstack security group rule create $SECGRP_ID --protocol icmp --ingress --ethertype IPv6
openstack security group rule create $SECGRP_ID --protocol tcp --ingress --ethertype IPv4 --dst-port 22
openstack security group rule create $SECGRP_ID --protocol tcp --ingress --ethertype IPv6 --dst-port 22

SSHアクセス

ssh -i ~/.ssh/id_rsa_cloud ubuntu@$FIP

08. OpenStack Dashboard

下記でopenstack-dashboardのIP確認

$  juju status  openstack-dashboard
openstack-dashboard/0*       active    idle   1/lxd/4  192.168.0.217   80/tcp,443/tcp     Unit is ready
  dashboard-mysql-router/0*  active    idle            192.168.0.217                      Unit is ready

こちらでアクセス可能です。
URL: http://192.168.0.217/horizon/

ドメイン:admin_domain
ユーザ名:admin

パスワードは下記のコマンドで確認できる。

juju run --unit keystone/leader leader-get admin_passwd
01_linux/08_仮想化/juju/01_juju_maas_openstack.txt · 最終更新: 2022/02/08 11:11 by matsui